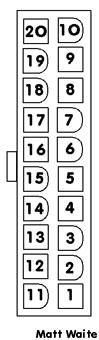
(View looking into pins of plug)
|
Pin number |
Description |
Typical Colour* |
| 1 | +3.3V | ORANGE |
| 2 | +3.3V | ORANGE |
| 3 | GND | BLACK |
| 4 | +5v | RED |
| 5 | GND | BLACK |
| 6 | +5V | RED |
| 7 | GND | BLACK |
| 8 | POWER GOOD# | WHITE |
| 9 | +5V STANDBY | PURPLE |
| 10 | +12v | YELLOW |
| 11 | +3.3v | ORANGE |
| 12 | -12v | BROWN |
| 13 | GND | BLACK |
| 14 | POWER ON | GREEN |
| 15 | GND | BLACK |
| 16 | GND | BLACK |
| 17 | GND | BLACK |
| 18 | -5V | BLUE |
| 19 | +5V | RED |
| 20 | +5V | RED |
NOTES: The predecessor to the ATX supply, the AT supply had two useful features. It would usually start with only it's internal cooling fan as a load, and it had a 'real' on/off switch. This enabled a suspect supply to be checked quite easily.
The ATX supply however is a little more tricky to test, as it uses a 'soft' power switch and requires an external load. In order to start, the supply must be loaded to at least 20W or (10% rated power), below this the supply may run, but regulation will be very poor.
This load can be achieved by connecting 4 or 5 paralleled 4R7 power resistors into a convenient drive power connector (across the 5V rail, between black and red). If the test is to last more than a couple of seconds ensure adequate heat sinking has been provided.
To start the supply simply short between pins 14 and 15 with a wire link.
*The colours indicated are only as a guide, there is no standard colour convention.
#The power good line will become high (+5V) shortly after switch on, when the supply outputs have stabilised.
AS WITH ALL SWITCH MODE PSUs, THE ATX SUPPLY IS POTENTIALLY VERY DANGEROUS. DO NOT ATTEMPT THE PROCEDURE OUTLINED ABOVE UNLESS YOU ARE SUITABLY QUALIFIED.
IT IS INADVISABLE TO EVER REMOVE THE LID OF THE SUPPLY AND ATTEMPT A COMPONENT LEVEL REPAIR. WITH A NEW SUPPLY COSTING LESS THAN A COUPLE OF PIZZAS IT'S JUST NOT WORTH IT!